Thursday, December 22, 2011

DIY Photo Coasters

These are great for a gift and super easy to make.

What You'll Need:
4 pictures (I printed mine in Sepia)
paper cutter
tiles
mod podge
water-proof sealant
rubber cement
cork

I got this pack of tiles at Home Depot for about $4 and it includes 9 tiles (two sets of coasters). 


Then I cut my pics slightly smaller then the size of the tile.

I then covered the front of the tile in mod podge and even put some on the back of the photo.


I adhered the photo to the tile.

Once I did all four, I then went back and mod podged the tops of all the photos. I did about 3 coats, allowing them to dry each time.


To make sure they were functional, I covered them one last time with a water-proof sealant (this one I found at Michael's, but any would do).


Once completely dry (I let mine dry overnight), I adhered the cork bottoms. I found the cork at Hobby Lobby in a roll.  I layed it out flat and measured squares the same size as the pictures (slightly smaller than the tiles).  Then I used my paper cutter to cut out each piece.


I used rubber cement to stick them on the bottom of the coasters.


Again let dry overnight and your done!
These would be an awesome wedding or birthday gift as well.


-W-


DIY Book Page Initials


I love decorating with initials.  I don't know why, I just do. I had done the above initial and when Whitney saw it, she thought it would be a great idea for some Christmas gifts for her family. 
So, we got together this week and decorated some initials for her family and here is how we did it.

Before beginning all this though, the night, or day before, you may want to go ahead and stain your book pages.  That way you are sure they are nice and dry for the project.  To learn how I stained my book pages just click on the link below.


First you want to go get some wooden letters from either Michael's or Hobby Lobby.  The flat ones are the best ones to use.  I have tried doing a 3 dimensional one and am still unable to get it to look right.


Get the page that you want to use and figure out how you want to place it on your letter.  I like having the top of the page at the very top of the letter.  Then flip the letter over and start tracing the outline of your letter.  You want to make sure you have enough paper to wrap onto the back of the letter to make sure the sides get covered up.


Then put som Mod Podge on your letter and put your page onto the letter.  You will have to smooth out the paper a bit to get rid of any bumps or bubbles but, be careful because you do not want it to rip.  And the small bubbles will go away the next day it is just the big ones you want to worry about.


Put some Mod Podge around the side of the letter of where you are working and wrap the paper around it to the back.  Then add some more Mod Podge onto the paper on the back of the letter so, it stays down.  It is kinda like wrapping a gift.  You have to fold the paper just right.  Once you get the hang of it though, it is pretty easy.


Here is  a close up of one of our letters.  Just keep covering up the letter with book pages. 


Here is the finished project. 

- L -


Wednesday, December 21, 2011

Free Printable Gift Tags


By The Handmade Home
            

 With Christmas right around the corner I wanted to share with ya'll these free printables by one of my favorite blogs, The Handmade Home.  Just print them out on cardstock, cut them, punch a hole in the top and tie a ribbon through it, and viola you have a stunning gift tag.  If you are like me, you still have some shopping to do and lots of wrapping so these tags will come in handy.  Plus, these tags can be used for more than just the holidays. 


By the Handmade Home


By the Handmade Home


Here is  the link to the printables:


Whitney just found some other free printables. Check them out!


Snowman free printable tags
By Living Locurto


These free printables include gift tags, water bottle labels, cupcake wrappers, cake toppers, and a poster.  These would be great for a holiday party.


Happy Wrapping

-L-

Holiday Party


Every year my good friend Yuehli throws a fabulous White Elephant Christmas Party.  This year she asked me to help. So in order to make things fresh, we decided to throw a Tacky Christmas Sweater/ White Elephant Christmas Party Extravaganza.    
 I thought this would be a perfect opportunity to try out some of our favorite things we've pinned on pinterest. 


Wine Glasses Dipped in Chalkboard Paint


This was one of my favorite crafts that we did.  Yuehli did all the dipping and said it was extremely easy.  I love it cause it looks really neat and it is actually practical. No one lost their glass.


Hot Chocolate Bar


This turned out really cute. It would be great for a child's party too (minus the Baileys). 


Cupcake Toppers


Totally free cupcake toppers.  Lindsey used Picnik to make these designs. Then printed them on card stock and glued them to sticks. Piece of cake!

Hope these give you some ideas for your future parties.

-W-

Monday, December 19, 2011

Homemade Marshmallows


Martha Stewart


For DD's birthday party I made some homemade snowflake marshmallows for party favors. It went great with the party theme and I put them with a bag of cocoa. They were pretty easy to do and really neat. It was amazing watching the sugar and gelatin turning into the fluffy white marshmallow in minutes.  I got this recipe and idea from the Martha Stewart website while searching for some ideas for DD's party.  Here is the recipe below.

Ingredients

  • 2 envelopes (each 1 scant tablespoon) unflavored gelatin
  • 1 1/2 cups sugar
  • 2/3 cup light corn syrup
  • 1/8 teaspoon salt
  • 1 teaspoon pure vanilla extract
  • Vegetable-oil cooking spray

Directions

  1. Coat a 12-by-17-inch rimmed baking sheet with cooking spray; line with parchment paper. Spray parchment; set aside. Pour 1/3 cup cold water into the bowl of an electric mixer. Sprinkle with gelatin; let mixture soften, about 5 minutes.
  2. Place sugar, corn syrup, salt, and 1/3 cup water in a medium saucepan. Cover; bring to a boil. Remove lid; cook, swirling pan occasionally, until syrup reaches 238 degrees (soft-ball stage) on a candy thermometer, about 5 minutes.  
  3. With mixer on low speed, whisk gelatin mixture, and slowly pour the syrup in a steady stream down the side of the bowl (to avoid splattering). Gradually raise speed to high; beat until mixture is thick, white, and has almost tripled in volume, about 12 minutes. Add vanilla, and beat 30 seconds to combine.
  4. Pour mixture onto prepared baking sheet; smooth with an offset spatula. Let stand at room temperature, uncovered, until firm, at least 3 hours or overnight.
        5.   Coat a 1- or 2-inch snowflake-shaped cookie cutter with cooking spray to prevent it from sticking. Cut out as many individual marshmallows as possible; coat cutter with more spray as needed. Use marshmallows immediately or store in an airtight container at room temperature up to 1 week.


Here are some helpful hints for when you make these.


1. When spraying your parchment paper with cooking spray don't be stingy.  You need to spray that sucker down so, the marshmallows won't stick.

2. When cutting out the snowflakes be sure to spray a generous amount of cooking spray onto the cookie cutter and you will have to reapply it frequently.  If you don't then the marshmallow will stick to the cookie cutter.

3.  When cutting out the snowflakes wiggle the cookie cutter a bit.  It seems to get the marshmallow out better.

4.  If you want to just remove the snowflakes off the sheet with your hands once you have cut them be sure to spray your hands with the cooking spray.  This will prevent your hands from sticking to the marshmallow.

It seems that all these hints are about the cooking spray.  But, I am telling you guys that it is a must for when you are making these and again, don't be stingy with the spray.
 

Here is a pic of the finished product. 

-L-

Tuesday, December 13, 2011

Snowflake Themed Birthday Party

Last weekend I had my DD's first birthday party.  I never knew how stressful and how much work went into throwing a party until I was putting together this one.  It definitely doesn't help that I am one of the biggest procrastinators.  But, it all came together nicely (thank goodness Whitney came over extra early to help me out) and DD had so much fun running around and seeing all the family and friends that came over to celebrate her special day. 


Since DD was born in winter I decided to throw a snowflake themed party in light pink and light blue with silver accents.  I ordered some printables from The TomKat Studio to help add a little extra umph to the party decorations.  So I got a Happy Birthday banner, some cupcake toppers, labels and some 4" round circles from them in their Snowflake Christmas party printables.  I just had them switch out the colors to what I was wanting.  It is an extra charge but, well worth it.  What is great about ordering from The TomKat Studio is that once you purchase your printables you have them in your inbox in 2 days and they are ready to print.

So here are some pics from the party.


Here is DD in front of her banner by The TomKat Studio. We just added some pink bows onto it and dangled some snowflakes at the end of the banner.


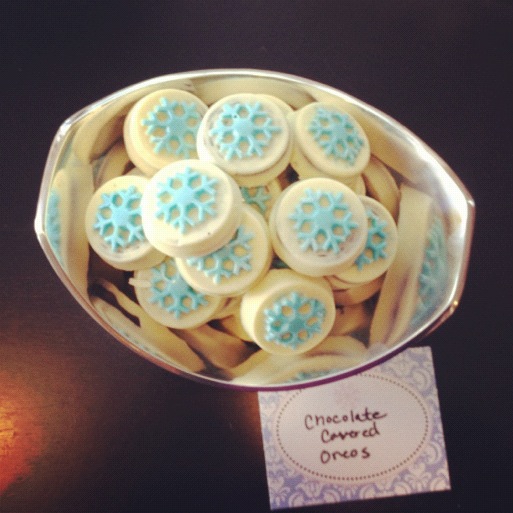
For the dessert table I had chocolate cupcakes, vanilla cake pops, chocolate covered oreos, and chocolate covered ritz crackers with peanut butter.  Yummy!! Desserts are one of my favorites so, I went a little overboard with them. Oh, and my DD had her own special little cake.


To make the chocolate covered oreos and chocolate covered ritz crackers with peanut butter I used Wilton's snowflake cookie candy mold. 


Vanilla Cake Pops.


Here is a close up of my cupcakes.  The cupcakes topper is from The TomKat Studio.


Here is DD's cake.  It turned out really good.  One of my hubby's co-workers made it for us.  I used the 4" round circle printable from TomKat and hot glued it to a popsicle stick.  Then I added a ribbon on to it.  I think it just adds the perfect finishing touch to the cake. 


We decorated DD's highchair with some snowflakes and the 4" party circles.


And finally here are the party favors.  I made homemade marshmallows and cut them out into snowflakes.  I then put the marshmallows with some hot cocoa and you have the perfect favor for a winter birthday party. 

Click here to learn how to make the marshmallows
http://biscuitsandburlap.blogspot.com/2011/12/homemade-marshmallows.html

One thing I did learn about throwing parties is less is definitely not more. You want more more more when it comes to decorations.  Whitney and I felt like we had so many decorations but, in the long run we could have used a ton more.  So next time I think we will be better prepared.

-L-

Monday, December 5, 2011

Jalapeno Cornbread

Hope everyone had a great Thanksgiving! I sure did. Thanksgiving is my absolute favorite holiday. The fam all gets together and enjoys football and great food.  This year I tried a couple of new recipes, one being Jalapeno Cornbread. 


 Surprisingly, it came out really good (which is shocking, because this recipe does not require an iron skillet). The texture was perfect and it had just enough spice from the fresh jalapenos.  The next time I make it, I would add a little more sugar. I like my cornbread a little sweeter, but overall it was excellent. Here is the recipe I followed:


Ingredients

  • 1 1/2 cups cornmeal
  • 1/2 cup all-purpose flour
  • 6 tablespoons sugar
  • 2 teaspoons baking powder
  • 1 teaspoon salt
  • 1/2 teaspoon baking soda
  • 2 eggs
  • 1 cup buttermilk
  • 1/4 cup olive oil
  • 3 jalapeno peppers, seeded and finely chopped

Directions

  1. In a bowl, combine the first six ingredients. In another bowl, whisk the eggs, buttermilk and oil. Add to the dry ingredients and stir just until moistened. Stir in jalapenos. Pour into a greased 9-in. square baking pan.
  2. Bake at 400 degrees F for 20-22 minutes or until a toothpick inserted near the center comes out clean. Cut into squares or wedges. Serve warm.
  - W -